Showing posts with label Buttons. Show all posts

Tuesday, 9 July 2013

16th Century Embroidery

For my birthday this year, I treated myself to a copy of Elizabethan Stitches by Jacqui Carey. I'm fascinated by the embroidered samplers of the period, especially those of Queen Elizabeth, like this embroidered bookbinding, completed by the Princess at the age of 11. Embroidery techniques from the 16th century are subtely different to modern stitches, enough so that I can see myself enjoying the challenge of learning them.

So far I've been working with just one stitch, but for two differnt projects.

The first is using detached buttonhole stitch to cover wooden beads. This was a common technique to embellish beads in the day, and if the time it takes me to do each button is anything to go by, they were a very effective way of displaying your wealth.


I've been using cotton embroidery floss to make these buttons, using all six strands together.The floss fluffs out when it is used, in theory filling the space between stiches so none of the wooden bead is visible. Hmm, yeah, my technique still needs tweaking.


Something I don't think I've mentioned here before, but I currently hold the post of seneschal of my shire. For those who don't know, the traditional symbol of office for that role is a gold key displayed horizontally on a red background, just like this one in progress in fact.


Again, I'm using cotton embroidery floss for this, but only two strands at a time, again in buttonhole stitch. Or do give it the full title from the book, Elizabethan corded detached buttonhole stitch. Takes longer to type out the name than it does to do a row of this stitch. I've really been pleasently surprised at how quick and easy this stitch is.

I've not decided yet what this is going to be used for. Do I have enough velvet to make a bag? Or do I turn it into a little, personal keepsake? 

Friday, 7 September 2012

Lo, the cufflinks arrived and the buttons were created. I admit, I did give in and added even more red dye to my solution and gave the buttons one more coat of stain. I'm much more pleased with the result now.

I used a coat of liquid wax to help seal the buttons then fixed the wooden disks using hot glue, applied carefully to the wood, not the heat-sucking-metal cufflink. Honest.


I'm very happy with the finished shrug. I put in on after taking this picture, and I'm still wearing it. It's so warm and cosy.

 
While the shrug project was in stasis for want of a postal delivery, it was time to move on with other projects. One of the next events I'm looking forward to is Mediveal Dead II, hosted by the SCA Shire of Eplaheimr, an SCA event that combines the best of historical feasting and battles with ghouls and zombies. I knew instantly what I wanted to make for my Arts and Sciences entry, and when a friend suggested I attend the Feast of the Dead as a plague victim, I thought it would round out my project nicely.


Using a tutorial online I made up some latex prosthetic boils and sores, which, combined with some more grease paint on the day, should help me look suitably disguisting on the night. The A&S project I'm hoping to make a start on this weekend.


At the Dun In Mara Shire A&S practice last night, I made progress on my needlelace.The lace is destined to become a lavender pillow for my garb box and I have some fine cotton gauze to back the linen with. The outline of the shape is completed now, which means I need to finalise my design ideas for this piece.

Sunday, 2 September 2012

When the competition was over, and I had my final update submitted, the first thing I did was to be quite ill for a week. Stupid throat. The first thing I wanted to do was continue with the crafting. I figured I could continue with the work from the costume or I could start something completely unrelated.

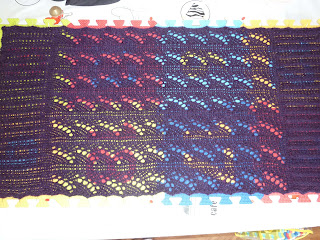
So I did the sensible thing and began knitting a pattern called Passionvine Shrug by Andrea Marquis. I finished up the shrug last night and set it to blocking. It argued with me a bit about being stretched out to its full size, but it was worth the fight to see the design "pop".


The shrug is designed to be closed at the ribbing with lapel style pins, to give various style options, so I decided to make up my own closures.


This involved some wooden disks picked up from a craft store and some spirit soluble dyes to make up my own wood stain. I used approximately 4 times as much red dye to blue, and dissolved the dye with some blonde shellac in methylated spirits.


The result was a blue toned purple that I think is as close as I'm going to be able to get it to the yarn without too much fuss.


My final snap shows the buttons with two coats of stain, definitely looking a little on the blue side. I'll leave them overnight to ensure they dry out fully, then give them a liquid wax coating to keep their texture, and in a weeks time when my ebay purchase arrives, attach them to cufflink blanks. And vóila, shrug completeness.